Monday, November 12, 2007

Encore 1/72 Polikarpov I-3

Encore kit 1014

Purchased
Completed: 12 November 2007
  • Nation: USSR
  • Era: 1920-1929
  • Justification: In the mid-1920s  the newly-formed USSR attempted to modernise its military. Nikolai Polikarpov's I-3 design gave the country an up-to-date fighter.

The kit

Anyone who builds plastic models on any kind of regular basis knows that the kits on the market can be divided into the easy-to-build "shake and bake" high-tech "Tamigawa" kits on the one hand, and the "character building" kits on the other.

If some part of this hobby is about building patience, then I'll join with Yakov Smirnoff in saying that "In Soviet Russia, model builds YOU"

I don't know much about Encore; but for a while in the 90s they were putting out a really interesting range of kits sourced from other manufacturers and reboxed (hence the company name I guess). Some of these were Heller offerings that while OOP were not terribly rare. Others, like this one, were from various Eastern European manufacturers pretty much unknown in the West. This kit originates with Latvian manufacturer Nakotne,
about which I know nothing else.

The entire kit is moulded on one sprue of dark blue-green plastic with a strange waxy feel. I've encountered this before with other Eastern European kits, so whatever the styrene recipe is, it's not unique to Nakotne. I was intrigued to see how the pattern-makers had worked around the limitations of their low-pressure moulding equipment. The sprue was quite cleverly laid out in order to minimise the attachment points to the parts. Detail overall was soft, and the panel lines around the engine cowling very deep in a Matchbox kind of a way. However, the moulding was generally quite crisp and clean and looked promising. Instructions were basic but perfectly adequate and same for the decals, which represent two Soviet aircraft distinguishable from one another only by their tail number! I wondered why they'd even bothered...

The build

Construction

Anyway, basic construction was very pleasant and easy, with parts fitting very well for a kit of this nature. Quickly, the I-3's racy lines began to emerge, and I was having quite a good time. The only real obstacle I hit was when it came to attach - you guessed it - the struts and the upper wing!
The problem here is that the very same mould engineering ingenuity I was praising eariler led to it being unclear where exactly the struts end and the sprue attachment points begin. Sure, there's a long skinny bit that protudes from the end of the strut, but how much of that are you supposed to leave on? After some deliberation, I concluded that it was all meant to come off. I duly clipped the interplane struts off and glued them in place. The result was not an altogether happy one, though. Doing this meant that the interplane gap ends up being far narrower than the instruction sheet and box art suggest that it should be. In fact, the bottom of the upper wing ended up sitting on the telescopic gunsight. I'm sure that's not right. I toyed with the idea of pulling the wing off again (like I had to do with the B.21) and lengthening the struts (like I had to do with the D.II), but while perusing the internet in search of some kind of definitive plans to show me exactly how far apart the wings should be, I came across build-ups of this kit by far greater modellers than me; and without fail, their interplane gaps were tiny too. This new sense of solidarity led me to throw accuracy to the wind and leave things as they were. For what it's worth, trimming the cabane struts right down to their very ends left them exactly the right length to meet up with their locating holes on the top wing and fuselage. I therefore conclude that the problem lies with the design of the kit rather than my understanding of where I was supposed to cut. Still, this is obviously a major proportional issue for the finished model, so those aiming for accuracy will need to address this. Arranging the undercarriage was a similar exercise. At least here, the outcome looks very much like the illustrations, but does leave me thinking that the stance of the plane looks very "high".

Painting

Painting couldn't have been much simpler - typical Soviet scheme of dark green upper and light blue undersides. I was done in no time!

Rigging and final assembly

Rigging was also very simple - just four pairs of flying/landing wires.

Decals

Decals should also have been a piece of cake; but unfortunately this wasn't the case. With just six national insignia, a tail number and a couple of white "lightning stripes" along the sides, there wasn't much to go wrong. Indeed, this< was so for the first three stars that I applied. But then, the fourth star shattered when I put it in water. The fifth star was OK, and the sixth shattered as well.

Conclusions

It's pretty disheartening to build a model, overcome the obstacles that you meet along the way, get it to the point where you're pretty happy with what you've built, and then have defeat snatched like this from the very jaws of victory. I was feeling pretty lousy when I finally parked my I-3 next to my similarly decalless B.21.

Lessons

If had to build this kit again, I would:
  • Do some research on the correct position of the wings and make or adapt struts to suit.

Images


Tuesday, September 4, 2007

KP 1/72 Avia B.21

KP kit 72161

Purchased
Completed: 4 September 2007
  • Nation: Czechoslovakia
  • Era: 1920-1929
  • Justification: Avia produced a number of world-class combat aircraft during the 1920s until overtaken by the rapid changes of the next decade.

The kit

I have quite a soft spot for KP/KoPro kits; in many ways, the poor Czech cousins of the Airfix offerings I remember so nostalgically. While generally nowhere near as nicely moulded, the parts breakdown, surface detail (including generous rivets) and general level of detail invites direct comparison between the two companies' products. Similarly, while Airfix did its patriotic duty in kitting many less celebrated British aircraft, KP produced kits of many important Czech planes that otherwise would not have seen light of day in scale form. The Avia B.21 was one of them.

My example was moulded in an extremely hard, shiny, brittle styrene, this latter characteristic demonstrated by the fact that one part (the cabane struts) arrived shattered into at least four parts. I say "at least" because despite the fact that the sprues arrived in a sealed polybag, I could only find three fragments of this part and there was still more of it missing. Parts breakdown was as expected, with the only remotely unusual feature being the topside of the forward fuselage being supplied as a separate piece, necessitated by the unusual shape of the engine cowling.

Mould quality was what I expected from KP - lots and lots of flash but otherwise not too bad. The instruction sheet was unremarkable but perfectly adequate, and the decals beautifully printed and comprehensive, offering five different aircraft and even a choice of different national markings from different periods.Unfortunately, they would not end up performing as well as they looked.

The build

Construction

Basic assembly was straightforward and presented no real problems until it was time to attach the upper forward fuselage. Predictably, fit here was thoroughly horrid with huge gaps practically everywhere. A lot of filling and sanding ensued, with me getting well and truly sick of it probably a couple of iterations short of a good job.

No prizes then, for guessing that strut attachment was going to be every bit as unpleasant. The key thing to note here is that the pins moulded onto the ends of the struts were simply way too small for the corresponding holes. I felt more comfortable slicing off the pins and basically butt-jointing things together than attempting to enlarge the holes. The other problem was that there was, as far as I could tell, no guidance whatsoever as to where the cabane struts meet the fuselage. More on this later... As I said earlier, the one-piece moulding that makes up all six cabane struts was shattered in my example. I reconstructed it as best I could, using a small piece of stretched sprue to fill in the missing section.

Eventually, everything went together more-or-less OK and I breathed a sigh of relief. I then started to plan the rigging and noticed something strange. There was just no way that the rigging lines could make any sense. As I looked harder at the model, I realised that this was due to the fact that I had actually installed the cabane struts backwards. Given the hassles of the build so far, I was immediately tempted by the "Who's going to know?" solution of leaving things as they were. I might even have done it too, if only I could have worked out how to rig the thing convincingly. In the end, however, the accuracy conscience won out, and I despondently pulled the top wing off the model, of course shattering the cabane struts again in the process.

Well, as with any such ordeal, the second time around is never nearly so bad, and it wasn't long before I was back where I started.

Painting

For the paint scheme, I chose one of the multi-coloured camouflaged options. The very early Czechoslovakian markings added extra interest. Because a few months have now passed since I actually did the painting, I have to admit that I've forgotten exactly what I mixed up. Anyway, this all went quite without incident, and when I finally pulled off the seemingly miles of masking tape, I was very pleased with the result.

Rigging and final assembly

Rigging also went without further hassles now that I had the plane actually assembled the right way, and it was time for the decals.

Decals

And disaster struck again. As soon as the beautiful decals touched water, they shattered into hundreds of tiny pieces. I tried a couple more markings from the sheet with exactly the same result. Without decals and with no reasonable way of replacing these unique markings, the Avia was finally relegated to the shelf sans markings. I'll have to include them on the custom sheet I'll need to get printed one of these days.

Conclusions

Well, this was a really unpleasant build. Admittedly, the worst part of it (breaking the model and having to rebuild it) was all my own fault, but that's pretty cold comfort.

Still, it's the only game in town in this scale, and that always rates highly with me. I guess I'm more usually pleasantly surprised by kits than unpleasantly, but this one left a bad taste.

Lessons

If had to build this kit again, I would:
  • Attach the cabane struts correctly the first time!

Images


Wednesday, July 11, 2007

Heller 1/72 Nieuport-Delage NiD 622

Heller kit 80224

Purchased: eBay, cheap
Completed: 11 July 2007
  • Nation: France
  • Era: 1920-1929
  • Justification: With over 600 built, the Nieuport-Delage NiD 42 family was the definitive French fighter of the age. They were elegant and way ahead of their time.

The kit

There was a time in the 80s when Heller seems to have been making some of the best kits on the planet, and this is one of them! So much so that I'm vaguely worried about how dull a review this may be.

I started this kit after having ruined the first Bristol Bulldog I started and while waiting for its replacement to arrive. Parts breakdown was utterly conventional, with the nice feature of replicating the real aircraft's construction in having the mainplane struts pass through the lower wings to form an attachment point for the undercarriage. My example was entirely flash free and moulded in high-quality grey styrene. The only flaws I could pick would be the overly simplified cockpit (with the usual disclaimer of "Who's going to see it anyway?") applying, and the fact that each of the undercarriage-mounted radiator units had a big ejector-pin mark right in the middle of them.

I bought this kit second-hand on eBay and had idiotically forgotten to read the fine print that said that the kit was being sold sans decals until after sniping it. This caused me some consternation until I discovered a complete set of Propagteam decals in my stash that accompanied the Smer release of this kit in the 90s. What happened to that kit itself I couldn't tell you - presumably it's still buried forgotten deep within the stash somewhere... So while I can't say anything about the Heller decals (one French Army, one French Navy aircraft), the Propagteam decals (same French Army example with crowing rooster squadron insignia and different French Navy example) were, as expected, beautifully printed and very, very thin.

The build

Construction


Assembly was a breeze - with the thing basically falling into place. Fit was splendid, construction easy and logical, and the whole exercise pretty much as unremarkable as one would hope for - no tricky spots, no gotchas, and no traps to warn the builders to come after me about!

Painting

Since I was still licking my wounds after melting that Bristol Bulldog, I treated myself to a rattlecan for painting this one too, in this case, Tamiya . With a basically solid colour scheme, this took a total of around ten minutes; and no melting involved.

Decals

Decals were every bit the high quality that they seemed to be on the sheet and went on without any fuss. If anything, the white decals that made up the large under-wing ID numbers and the stripy bands on the horizontal stabiliser weren't as opaque as I would have liked. I predicted this, and had considered painting the bands on the tail, but realised this was pretty pointless unless I also undertook to paint on the numbers too, and that was a job that I very definitely did not feel up to. In this respect, I'm pretty sure that the Heller decals would have been thicker and more opaque.

Conclusions

Well, there's not much more to say; the kit was great, Tamiya spray paints are great, and the whole exercise was a real pleasure. The finished model captures the elegant, Art-Deco-like lines of the original very well, and makes the Bristol Bulldog next to it on the shelf look very much like a relic from a bygone age even though these types were exactly contemporary. A real gem!

Lessons

If had to build this kit again, I would:
  • Change nothing!

Images


Monday, June 18, 2007

Airfix 1/72 Bristol Bulldog

Airfix kit 01083

Purchased
Completed: 18 June 2007
  • Nation:United Kingdom
  • Era: 1920-1929
  • Justification: The Bulldog was the culmination of British fighter development of the 1920s, and served with the RAF and many foreign air forces well into the 1930s. To my mind, the Airfix kit is also iconic.

The kit

This is what it's all about! If you've read the introduction to this project, you'll know that it was nostalgia for old Airfix kits that got me started back in the hobby after a hiatus of a few years; and this one is a real classic! Actually, when I opened up the box, I realised that this must be one of the few 70s Airfix releases that I can't remember ever building.

This kit is a real gem, and it's difficult to believe that it's now the better part of 40 years old. While it's true that the interior is typically sparse (seat and pilot figure and that's it), the engine is just beautiful. My examples (yes - examples - wait for it!) were generally well-moulded, but some of the smaller parts had a bit of flash on them. The parts breakdown is fairly typical other than the fact that the upper wing is divided in three sections. The way that the lower wing attaches is also a little unusual, locking in place with a strange, cylindrical peg that's still visible after assembly. I'm not sure whether this represents any feature on the real aircraft, but I suspect not! (I've tried to find a clear view of the underside without success). One curiosity is the fact that one exhaust pipe is significantly larger than the other, and oriented differently on the sprue? Another pattern maker on another day? We'll probably never know. Decals are provided for one RAF and one Swedish Air Force machine and appear well-printed.

The build

Construction

Construction was every bit as straightforward as I hoped, with the fit more than reasonable. I made an instrument panel from a bit of sheet styrene and stuck it in but didn't worry about anything more. Since I wasn't planning to use the underwing bombs, I also puttied over the holes for these. I also puttied over the only sinkmark of any note - in the centre of the lower wing. The only problem I ran into (the first time round...) was that I attached the lower wing before the little struts that attach it to the fuselage. These proved to be very fiddly to position after the fact.

Painting

With fuselage and upper wing assembled, it was time for paint. After all the dramas of my previous three builds, I was enjoying this straightforward build and decided to reward myself further by using a rattlecan for painting rather than worrying about setting up and cleaning the airbrush. And this is where disaster struck. Being cheap, I realised that I still had a can of Humbrol Silver left over from pre-hiatus days. Since it was now about five years old, I tested it out on some scrap card. When this proved OK, it was time to move onto the model. At first, the paint went on fine, but as it dried, something went very badly wrong. Gradually, the paint finish took on a rough, pebbly texture. I now had a plane that looked like a very rough, crude aluminium casting. Oh dear.

My first instinct was that some gentle sanding might even out the finish enough to allow for another coat (from another can, obviously!), but this finish was hard as rock, and it became quickly apparent that this process was going to remove surface detail along with the paint. So, I decided to try and soften the paint up and maybe wipe it off. With that fateful decision, I reached for a rag and the enamel thinner.

Well, the thinner attacked the paint alright; but when it also started dissolving the plastic, I knew this had been a mistake. There was nothing for it now but to shelve the kit and start again. I ordered up a replacement and then switched to another model until it arrived.

With the replacement now in hand, I treated myself to a brand-new can of Tamiya paint and started again. This time, the build went without incident. Having the second kit to draw on allowed me to choose the more realistic, thicker exhaust pipe for both sides of the aircraft. The struts and upper wings went on with an absolute minimum of fuss (for a change) and the only glitch was that I discovered that I had left the telescopic sight and windscreen off. Attaching these with the upper wing in place proved tricky, but nothing worse.

I had all but finished assembly when I realised with horror that I'd made another mistake and left off the anti-glare panel painted along the whole of the upper fuselage! Putting it on now would mean removing the upper wing and at least the cabane struts. Weighing up the benefits, I decided I'd just have to live with the inaccuracy this time, but was very annoyed!

Rigging and final assembly

Uneventful.

Decals

I had considered that another benefit of having another kit to draw on would be that I could use its decals to change the supplied serial to match that of the Bulldog in the RAF musuem K2227. After discovering my bungle with the anti-glare strip, however, I decided that the basically identical kit decals would do just fine, thank you. The decals were every bit as good as they looked, with the only caveat being make very sure to trim off as much of the carrier film as possible - there's not much spare room for that upper-wing chequerboard pattern!

Conclusions

All in all, a very simple and pleasant build. Don't underestimate how much better replacing the anaemic exhaust pipe will make the finished product. The only problem of any sort encountered along the way was my self-inflicted misery of the out-of-date paint. A really fun kit that I can't recommend highly enough!

Lessons

If had to build this kit again, I would:
  • Always use fresh paint!

Images


Friday, May 25, 2007

Joystick 1/72 Ansaldo A.1 Balilla

Joystick Models kit Joy 15

Purchased: Hannants, £7.40, photoetch wire wheels from Jadar-Model, zł 32.00
Completed: 25 May 2007
  • Nation: Italy
  • Era: 1910-1919
  • Justification: As far as I can tell, this was the only Italian-built fighter to see squadron service during World War I. Some machines saw service with foreign air forces in the 1920s. 

Introduction - who's afraid of the big, bad vac?

I've lived most of my modelling life with an unhealthy fear of vacs. Sure, I've collected quite a few over the years, but these have all been safely sequestered away deep within my stash, with the fervent hope and prayer that I'd never have to actually build one of them. Time and time again I've been saved by the familiar strategy of "if I hold onto it long enough, I'll never have to build it - someone's sure to come out with an injection-moulded or resin kit of this sooner or later..." I'm especially grateful to Academy for saving me from building that vac kit of the Boeing Stratocruiser!

Precisely why vac building has acquired its reputation as one of the Dark Arts is a bit of a mystery; if you listen to anyone who's ever actually done it, they all seem to say that there's nothing to be afraid of and that it's really quite like building an injection-moulded kit. Nevertheless, that advice gets treated with the same kind of confidence reserved for doctors' assurances that "this won't hurt a bit" . Well, guess what? It is really easy - I was very, very surprised.

Conventional wisdom is that one should delve into vac building gently, perhaps by tackling a conversion kit first, or at least with a simple, non-fiddly subject. Well, I'm not very conventional nor perhaps very wise, so for my very first vac ever, I chose a World War I biplane in 1/72.

Why a vac? Simple - cost. The Ansaldo Balilla has been kitted in this scale a number of times. Apart from this kit, it's been issued as an injection-moulded model (by Hit Kit) and more recently, as a very favourably-reviewed resin (by Karaya). Now, normally with both an injection-moulded and resin alternative available, there would have been no way in the world that I would choose a vac. However, this project was meant to be as low-cost as possible; so nice as the Karaya kit was, I just couldn't justify spending over €20 on a 1/72 biplane when there was an alternative at 1/2 the price. As for the Hit-Kit offering, it seems to be quite scarce now and not much cheaper than the Karaya kit when it can be found (while being reportedly of quite low quality). So, vac it was.


The kit

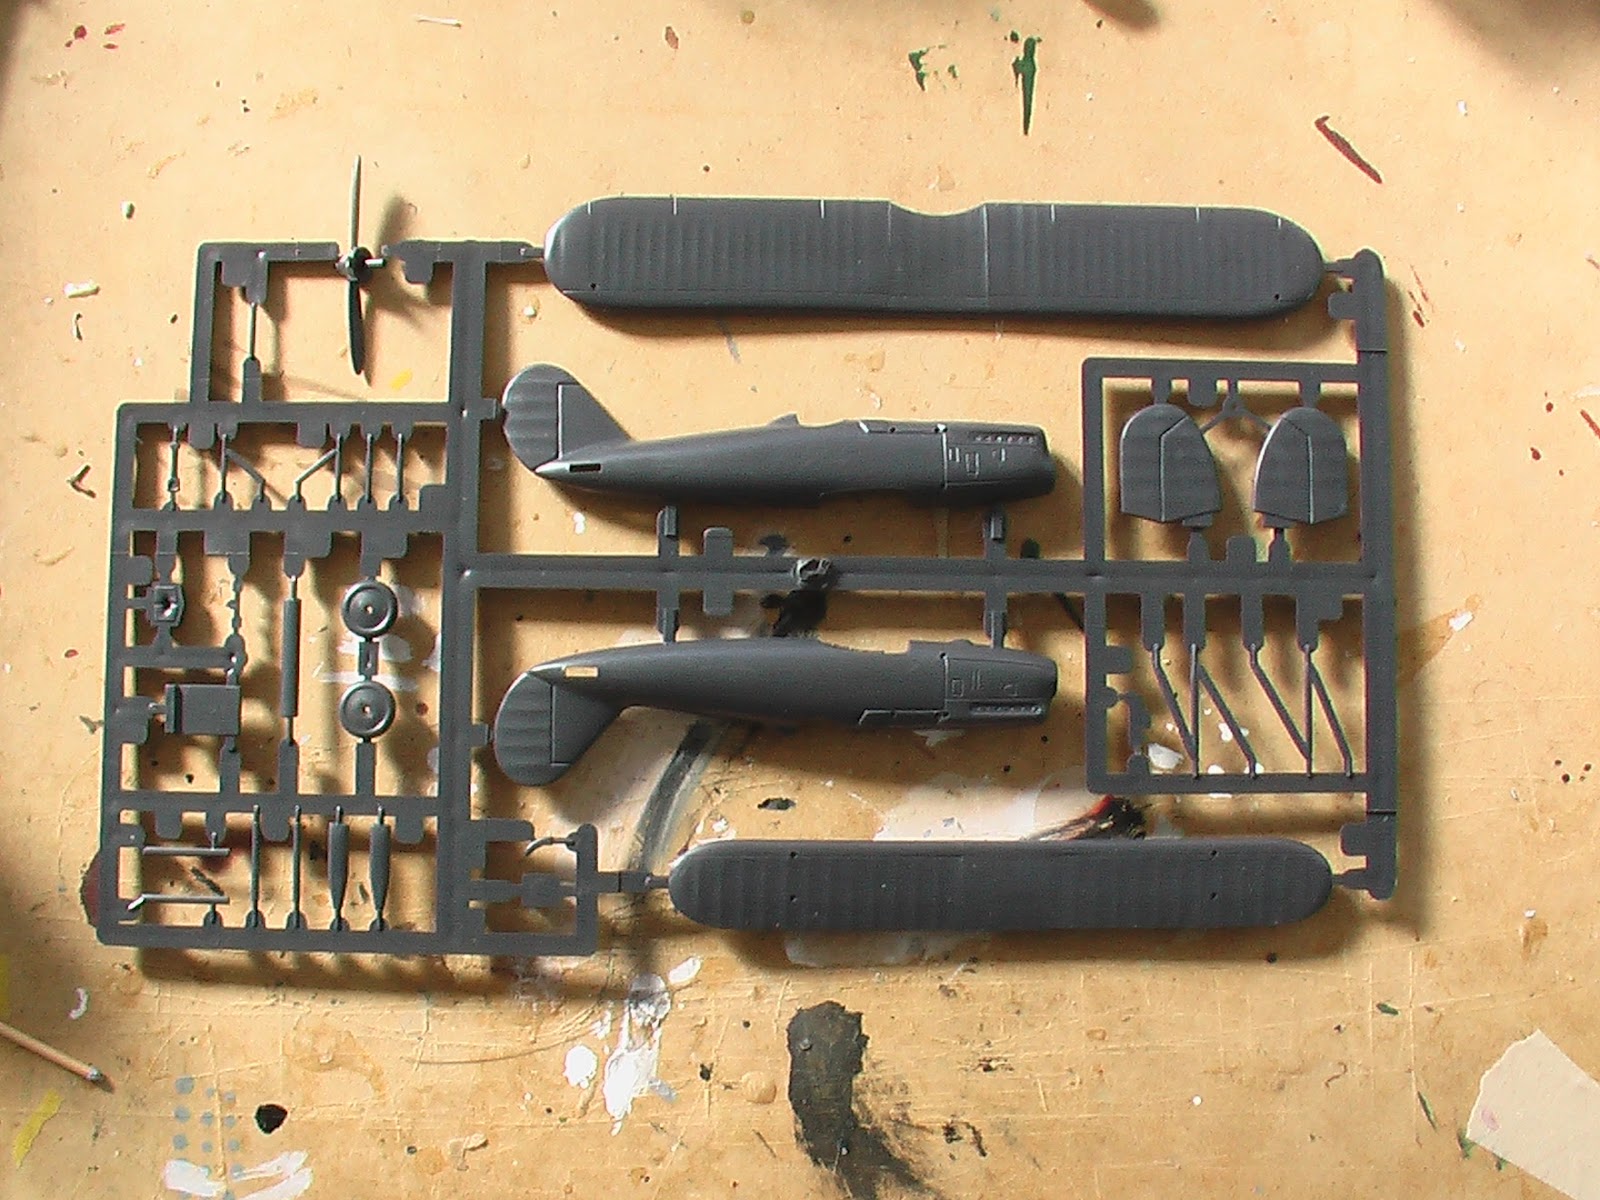
I'm assuming that most people reading this article are at least familiar with what a vac is, but just in case, I'm going to take this a bit more slowly than usual. Knowledgeable readers who get bored are invited to skip ahead... Well, the picture at right speaks for itself, really. The shapes that go together to make up the model have been created by a flat sheet of plastic being heated up and formed over a mould. This immediately gives rise to the most noticeable difference with building an injection moulded kit: instead of just snipping the parts off a small number of attachment points holding them to a sprue, the shapes that make up the vac kit must be cut out from the surrounding sheet of plastic that they were formed from. Actually, for anyone who's built a few poorer-quality short-run injection-moulded kits, this is not so formidable (I remember a Yak-25 from some anonymous Russian manufacturer that had nearly as much flash as this kit!) but I'm getting ahead of myself.

The kit provides the fuselage as the familiar left-and-right sides, and includes a surprisingly complete cockpit compared to the injection-moulded biplanes I've built for this project so far. All flying surfaces are represented as single-sided only, meaning that due to the limitations of the moulding technique, one side is completely lacking detail. The kit itself has been produced using a female mould, and there is a decent amount of really fine surface detail, including various panel lines on the fuselage and ribs on the flying surfaces. Moulded templates are provided for the struts, as well as representations of the undercarriage. I couldn't decide whether the latter were intended as templates or to be cut out and used. I eventually decided to use them. Five cast white-metal detail parts round out the kit.

There are no instructions to speak of - just a three-view plan and some general vac-building advice in prose followed by specifications and a brief history of the subject. Decals are provided for two Polish examples, along with some spare decals for Kosciuszko Squadron that can be used on other kits such as an Albatros D.III. On my example, the decals were pretty crude and badly out-of-register.


The build

Construction

With no shortage of trepidation, I began construction by following the sequence I'd so often read about but never attempted myself. First, I made a series of scores in the carrier sheet around each of the major parts. This was so I could snap the plastic along these scores and isolate each part. When I had each component on its own small carrier sheet, I traced around each one in turn with a Sharpie marker. Now the fun began. With a new #11 blade, I scored the plastic around each part, trying to undercut the part at around a 45° angle. This cutting out of the parts is, I think, the first of two mental obstacles that most of us have in our thinking about vacs, but in honesty only took around 5-10 minutes. The second of the obstacles was next: sanding! The idea now is to sand away the last bits of carrier sheet remaining underneath the parts that have just been cut away. Cutting at an angle reduces the amount of material that needs to be removed, and the marker pen line indicates the point at which the part originally sat on its carrier - sand thus far, but no farther! Most treatises on the subject recommend gluing down a sheet of sandpaper to a hard surface and then gently rubbing the part against that until the pen line is reached. Instead, I used an emery board and just sanded each part until I reached its pen line. All up, this took around 20-30 minutes, and I was now pretty much at the point where I would have been with an injection-moulded kit. Small parts like the cockpit interior, I simply cut from the backing with a pair of sharp nail scissors.

I have no basis for comparison, so I don't know whether this particular vac kit was good, bad, or indifferent, but I was amazed by how much easier and quicker this all was compared with what I had been expecting!
Construction now followed the familiar pattern. I began by installing the cockpit, which Joystick provides as front and rear bulkheads (the front also containing the instrument panel), a floor, and the white metal seat. With absolutely no guidance from the instructions, I simply had to make a guess as to where these bits went. Fit (at least where I put them!) was excellent. I now joined the fuselage sides and then encountered my first problem with this kit when I went to attach the white metal radiator to the nose - because the radiator is noticeably taller than the nose of the vacform fuselage. I used CA to attach the radiator so that it lined up with the fuselage top. Fortunately, the Balilla's fuselage is flat-bottomed in cross-section. This meant that I could glue scrap styrene to it (left over carrier sheet!) and blend it in so that there was no step remaining between the parts. A lot of putty and sanding later, and it worked out quite well. I painted the fuselage at this point (see next section), and then started worrying rather belatedly about how the lower wing was supposed to attach. Well, if I'd thought about this sooner, I might have been tempted to cut slots in the fuselage sides to accept tabs shaped into the lower wing. But I didn't, so had to come up with some way instead whereby I could safely butt-joint the wings on. The lower wing was scribed with marks showing the position of the fuselage sides, so I separated the wings along these lines and set out to shape the mating surfaces. The problem is that the fuselage sides of the Balilla are gracefully curved, whereas the lines marked on the wing were straight. I now had to try and sand a concave line into the wing roots that would match the curve of the fuselage as much as possible. I thought I did a pretty good job, but later, when the top wing was in place, I discovered that I'd only got it 50% right: the port wing is spot on, but the starboard wing was left with a slight forward sweep. Oh well.

It was also around this time that I briefly considered adding rib detail to the undersides of the wings. I'd read about a technique of filing small grooves into the surface, then liquid cementing fine plastic rod in, then sanding this to almost nothing. However, since things seemed to be going so well, I decided not to tempt fate on my first vac, and left these surfaces smooth.

Painting

As usual, I wanted to duplicate a preserved aircraft, and the obvious choice is Antonio Locatelli's machine preserved at the Bergamo Museum of History. Once again, this aircraft features some elaborate markings (paintings of St George slaying the dragon) that will have to wait until I have enough markings to commission a custom decal sheet from somewhere.

I'm really quite chuffed about how the fuselage paint scheme worked out. This was meant to resemble varnished wood, so I tried out another new technique that I'd read about somewhere. I began by brush-painting the fuselage Tamiya XF-68 NATO Brown overall. When this was dry, I drew wavy lines all over it with a 0.4 mm black draughting pen. In turn, when this was dry, I painted over the top of it all with Tamiya X-27 Clear Red. The effect was magical! I was so pleased with the outcome it made me want to do it again straight away (visions of an Albatros with a fuselage of honey-coloured light wood...) but instead, I painted the engine cowling XF-16 Flat Aluminium, and mixed up a brassy colour for the radiator from the same paint with a little X-12 Gold Leaf stirred in.

The wings and tail were more prosaic, airbrushed in my usual linen mix of 50-50 Flat White XF-2 and Buff XF-57. The red and green identification bands under the wings were plain XF-7 Flat Red and XF-5 Flat Green. On the upper surfaces of the top wing and stabiliser, The same flat green was brushed on in geometric lines with a #00 brush, with XF-9 Hull Red over the top of it in a separate pattern. The XF-9 was really too brown (as I noted once before, but didn't learn from...)

Rigging and final assembly

I'll admit that I cheated a little here. Instead of using the rod and strip supplied with the kit to make the struts, I robbed an Airfix Avro 504K. The supplied stock just seemed way too flimsy to me, and like I said, I wasn't in the mood for tempting fate. Everything went together well, with the only remaining snag being the wire wheels. As with the previous Sikorsky project, I wanted exposed wire wheels on this plane, while the supplied cast metal parts represented canvas-covered wheels. I didn't think that I'd be able to use the same trick as I did on the Sikorsky project, thinking that it would be harder to work with the metal wheels, so I started looking for plastic replacements. Noting that the wheels were about the same size as those of my Fokker D.VII, I found another one of these kits and proceeded to saw one of the wheels in half. Unfortunately, the Fokker wheels were much much thinner than those of the Sikorsky, and I quickly ruined one of them. I started looking for wheels of similar diameter but greater thickness, and tried a pair from a Testors F4U Corsair. These worked OK, but even after prolonged sanding, the Corsair tyres were way too big - the result looked like dune buggy wheels! Eventually, I just ended up cutting discs from sheet styrene, drilling out the centres, and sandwiching the Eduard photoetch discs between them. The result looks way too flat for my liking, but it's the best I could come up with.

Rigging was a mercifully unremarkable experience.

Decals

As it happens, there was one pair of Italian roundels on the decal sheet, but Locatelli's machine needs two pairs and the ones provided were so far out of register anyway that I didn't try to use them. Decals will wait for now.


Conclusions

Well, a lot of things went right here! The vac building experience proved quite painless, and the wood finish on the fuselage was both fun and effective. Go out and build a vac!

Lessons

If had to build this kit again, I would:
  • choose a better colour for the red camouflage (repeat after me... Hull Red is not red...)
  • find a better way to do the tyres


Images


Wednesday, February 28, 2007

Eastern Express 1/72 Sikorsky S.XVI

Eastern Express kit 72218

Purchased: Hannants, £5.99, photoetch wire wheels from Jadar-Model, zł 32.00
Completed: 28 February 2007 (wheels added in May)
  • Nation: Russia
  • Era: 1910-1919
  • Justification: As far as I can tell, this was the only Russian-built fighter to see squadron service during World War I. Some machines remained in service in secondary roles into the 1920s. 


The kit

This kit is identical with the S.XVI marketed by Dako-plast - indeed, it still bears the Dako-plast name moulded into the single sprue of hard, brittle white styrene and one can see where the Dako-plast logo has been crudely whited-out on the equally crudely photocopied instruction sheet. Classy!

The quality of the moulding is generally good - with really nice, petite detail on the gun for example. Another, more knowledgeable reviewer has pointed out a number of deficiencies with the kit, including it being about 10% underscale and not representing any particular variant of the S.XVI, but rather, a conglomeration of features from different ones. Decals are provided for a single, generic machine. This is perhaps fortunate because that the paint plan on the poorly-reproduced instructions is useless. With such a simple paint scheme, this isn't an issue though. Options are provided for either wheeled or ski undercarriage, and therein lies one of the kit's greatest shortcomings. The exposed, wire-spoked wheels are a distinctive feature of this aircraft, but here, the four mainwheels are provided with solid hubs - as if they represented canvas-covered wheels. I knew from the outset that I wanted wire wheels, so ordered an Eduard set which three weeks later unfortunately still hasn't graced my mailbox at the time of writing.

One real peculiarity of the kit is the parts breakdown. While it's common for small 1/72 aircraft kits to have a one-piece wing that the fuselage halves sit atop of, generally the cutout on the fuselage halves matches the airfoil shape of the wings. For whatever reason in this case, Dako-plast chose to make this cutout rectangular, and included a rectangular chunk of lower fuselage moulded integrally with the one-piece wing. When you see something as bizarre as this, you just know that it doesn't bode well!

A reasonably detailed little cockpit is provided - with a full forward bulkhead, steering wheel (yes!), and rudder bar. This is fortunate, since the cockpit is one of the most exposed that I've ever seen. A superdetailer could go really nuts here. I am not that superdetailer.


The build

Construction

While the major airframe components went together quite well, this kit's devil is definitely in the detail. The main problem early on was, as predicted, the weird wing-to-fuselage joint. This required lots of putty and lots of sanding to get to an acceptable finish. And then there was still a bit more sanding!

The problems with this kit are many, but mostly reflect very sloppy engineering with regard to the fit, placement, and thickness of parts. My experiences, I'm happy to note, paralleled those of Michael Kendix's review that I referred to earlier, and I take comfort in the fact that "it's not just me"!  I'll cheerfully confirm Michael's observations that:
  • the fuselage won't fit over the cockpit assembly unless the cockpit firewall is considerably reduced in height first
  • the alignment of the fuselage halves is poor (I'll actually disagree with Michael here and say that it is a bigger deal than usual, on account of the fact that the top and bottom of the fuselage on the S.XVI are completely flat surfaces, which makes sanding a real pain)
  • the engine cowling won't fit over the engine unless the thickness of the cowling is reduced dramatically. I was especially grateful to have forewarning of this, as I think it would have caused me no end of grief had I blundered into it unaware.
  • The location of the machine gun and ammunition chute is anyone's guess really. The only clue provided by Dako-plast, a groove in the forward fuselage, is clearly not an option since in that spot the gun will foul one of the cabane struts. Going on my limited references on this aircraft, it seems to me that the proportions of the kit are quite off in this area, which can't help. The gun also looks a little big to me, making me wonder whether the gun at least is around 1/72 when the airframe around it is in a smaller scale?
In the end, this is all just griping though, and there's nothing here that persistent sanding and a little jiggling about of parts won't fix.

Painting

While there's no surviving example of an S.XVI known anywhere in the world, a full-scale replica was built by a group of Russian enthusiasts and finished by Sikorsky in the United States. It resides at the New England Air Museum in Connecticut and I chose to model this aircraft, not only as the closest thing to a real S.XVI in existence, but because of it's easy and generic markings, that incidentally match the ones provided with the kit!

The whole aircraft was painted in a Clear Doped Linen colour mixed roughly half-and-half from Tamiya Flat White XF-2 and Buff XF-57. The engine cowling and forward fuselage were then brush-painted Flat Aluminium XF-16 and that was it! Yay!

Rigging and final assembly

Rigging was pretty straight forward, although I did experience more breaks than normal, probably because the strut attachment points are pretty weak on this model. In fact, the cabane struts are simply butt-jointed to the fuselage sides. In retrospect, I wonder whether I should have cemented these on before the first coat of paint went on - a bare-styrene-to-bare-styrene cemented joint being undoubtedly stronger than an acrylic-painted-styrene-to-acrylic-painted-styrene CA'd joint. Rigging the intricate undercarriage assembly was tedious, but not especially difficult in any way.

I've left the wheels off while I await their photoetched replacements.

Decals

Decals were pleasantly thin and in register and their application was entirely unremarkable. Good!


Conclusions

This provided a nice, relatively simple build. A bit dear for what you get in the box, but that's expected to some degree for these obscure subjects. While there were undeniable problems with the kit, these were no greater or more problematic than those of the average short-run product. While apparently not really that accurate, the finished model does capture the S.XVI's ungainly stance quite accurately. I was left with the impression that having mastered aeronautical ugliness to this degree so early on, helicopters were just the next natural step for Sikorsky! :)

Lessons

This list would have been a long one if Michael Kendix hadn't taken the fall for me! But if I had to build this kit again, I would:
  • try and achieve more solid attachment of the struts from the outset, to make rigging neater and less painful later.


Postscript: Wheels

Well, the Eduard photoetched wire wheels (set 72-439) arrived after a few weeks. The set is a single photoetched fret with finely-etched discs to represent spoked wheels in eight sizes (four discs per size). Each set of four is to equip a single model, since Eduard suggests that you lightly dish the discs using a ball bearing and then attach them concave-side to concave-side before adding a tyre. With double the number of wheels on this aircraft to begin with, laziness once again got the better of me and I resolved to just use one (un-dished) disc to represent each wheel. The big question was: what to do about tyres? Advice I solicited online was either to find a suitably-sized rubber grommet to fit, or cut discs from a length of styrene tube. I chose to do something like the second suggestion. I took the kit wheels, then sawed them in half across their discs (much easier than it sounds - I simply ran them gently back and forth along a razor saw blade until they parted) then drilled out their centres to leave only tyres remaining. I then glued them back together with the photoetch discs in the middle, and used copious amounts of putty to fill the resulting gaps. This made a world of difference as against the kit-supplied solid centres, and I'm very glad I used them.


Images


Wednesday, February 14, 2007

MAC 1/72 Phönix D.II

MAC kit 72036

Purchased: Squadron, $USD 11.96
Completed: 14 February 2007
  • NationAustria-Hungary
  • Era: 1910-1919
  • Justification: The ultimate development in Austria-Hungary's domestic fighter production. Derivatives continued in Swedish service after the war. 


The kit


This is a typical example of the nice short-run kits that have been coming out of Eastern Europe for the last decade or so. Moulding is very nice, even accounting for the slightly thick parts and wide sprue attachment points necessitated by the low pressures used in production. The main sprue contains a number of parts not used for this particular Phönix model, but for other variants marketed by MAC (they also do a  D.I and a D.IIa - see this Internet Modeler article for a comparison of the sprues). Fine parts, such as cockpit details, are provided as photoetch, and there's a small sheet of printed acetate to provide cockpit gauges and a windscreen to cut out.

Decals are provided for three aircraft, which are not identified in the instructions, but which other sources identify as those of Karl Teichmann, Alexander Kasza, and Hans Leiner. These are of the high standard that's come to be expected from Eastern European printers. 


The build

Construction

The first phase of construction went very well indeed. The interior parts fitted together well, although the photoetch instrument panel was slightly the wrong shape to sit happily inside the fuselage. I had to trim a little off each side to get it into place, and even now there's still a little gap between the top of the panel and the fuselage. I didn't bother with the photoetch control stick and rudder bar, since the former will be practically invisible and the latter completely invisible once the model is complete. The lower wings are provided with locator pins to aid their joint to the fuselage. These, however, are far too large to fit into the corresponding holes in the fuselage sides, and I ended up slicing them off and just butt-jointing the wings on, after roughing up the mating surfaces to give the cement something to really key to. The tailplane assembly is unorthodox - it slides into a slot provided at the rear of the fuselage once the two sides are together - but works well. I left off the engine head and intake manifolds for now, adding them after the painting was completed. With the prominent exhaust pipes such a focal point of the model, I felt I had no choice but to drill them out, which I did by twisting the end of a new #11 blade in them.

Painting

With no preserved aircraft to serve as a guide, I based my paint scheme on information provided in the instructions and on the box-top painting. Actually, I think I followed the box-top too closely, resulting in an aircraft that's predominantly brown instead of predominantly green, as it should be (according to the instructions, anyway). Reading that the real aircraft's camouflage was applied with a rough sponge, I began a search for a suitable tool. I wondered if there were another way to apply this rather than stippling it on with a dry brush. Fortunately, inspiration struck in the form of a type of eye makeup applicator. This is a short stick, about 50 mm (2 inches) in length, with a fine sponge at the end of it. I bought a pack of 12 for just $AUD 4 from a nearby chemist (in a "convenient purse pack"), and tests on some scrap plastic showed it to be ideal for the job when used almost dry. I just wish I had the colours right!

I'm pleased to report that I can indeed learn from past experiences, and after the paint was on, I made small holes about mid-chord where the lower wings meet the fuselage and attached the first rigging lines here.

Rigging and final assembly

This is where things all went pear-shaped. As I proceeded to attach the upper wing, it soon became apparent that something was very wrong.

I had begun by attaching the cabane struts to the fuselage, using a card template cut to the width of their attachment points on the upper wing to keep them properly aligned. I followed this with the upper wing itself. So far, so good. I was still feeling pretty happy with how this model was going together. Next, I went to put the interplane struts in place. They wouldn't go. And as I wrestled with the struts on one side, the cabane struts broke loose from their attachments to the fuselage. Fine, I thought, I'll finish with the interplane struts, then re-attach the cabane struts. Except that when I did, the interplane struts broke loose. Uh oh.

Putting the model aside for a moment, I tried to work out what the problem was. I realised that there were three possibilities: the forward interplane strut was too short, the cabane struts were too long, or there wasn't enough dihedral on the lower wing. Consulting the beautifully-drawn plans on the back of the instruction sheet, I confirmed that the lower wing shouldn't have any dihedral at all. OK - so it's a problem with the struts. MAC provides all four interplane struts as identical parts; however, the drawings clearly show that the forward struts have to be longer than the rear ones. Returning to the model, I trimmed an end off two of the struts and lengthened them about 3 mm with scraps of sheet styrene. Now everything went together with minimal fuss. So beware! Actually, had I done a bit more research, I would have been forewarned of this problem, since it's mentioned in the Internet Modeler review of this kit, as well as in two reviews of the closely-related D.I kit. 

Rigging followed and presented no particular problems, other than pulling out the odd strut attachment here and there (presumably weakened by the foregoing mucking about).

Decals

I only used the national markings from the sheet, and the decals performed exactly as expected. They were  crisply printed, very opaque (even the white around the national insignia) and very thin. Actually, maybe even too thin, given that they were also provided with very powerful adhesive - I managed to tear two while positioning them, but was able to lay the fragments in place before the adhesive really took.


Conclusions

This project started out pleasantly enough, but the dramas provided by the strut debacle really soured the experience for me. The struts pulled out and were reattached so many times that the finish around the points where they meet the wings is well and truly trashed. Coupled with my getting the paint scheme wrong (only my own fault), that means I have a model here I'm not very happy with. One day I might come back and re-do it, and when I do, I'll be satisfied to use the same kit.

Lessons

If I had to build this kit again, I would:
  • cut the forward interplane struts from scratch!
  • read the painting instructions more carefully


Images